There are plenty of URL redirection plugins are available through WordPress repository now a days. But Urban Giraffe’s Redirection Plugin is very famous, easy to use and periodically updated WordPress URL redirection plugin available through WordPress repository which is downloaded and installed more than 400,000+ times.
Through this post here we explains you to how to setup Bulk CSV URL redirections using urban giraffe’s WordPress redirection plugin.

Setup Bulk CSV URL Redirections
Using Urban Giraffe’s Redirection Plugin any one can able to setup URL redirections with unique and easy UI with various redirection options such as 301, 302, 307 redirections for WordPress posts and its automatically setting up 301 redirection when you edit your post URL. So, there will be no longer appears broken links warnings in your WordPress site and Google webmaster tools never shows any warning in it about broken URLs if you already manage your website through Google webmaster tools.
Even you can easily track the complete logs of redirected URLs, 404 error monitoring, manage the redirections in groups, export 404 error logs as CSV, Bulk import redirection URLs using CSV & .htaccess files and lot more. But unfortunately there is no enough documentation available about how to setup bulk import URL redirections.
In this tutorial here we are showing you, how to setup bulk redirecting broken & unnecessary URLs using CSV and .htaccess files.
Setup CSV File for Bulk CSV URL redirections
Create excel file with 4 columns (for simple 301, 302 or 307 redirects) and name the columns as source, target, code, match. In the second row, first column enter source URL you wish to redirect and destination URL in 2nd column / 2nd row. Repeat the steps as illustrated in below sample CSV file and save as .CSV file format. (Don’t save as worksheet)
| source | target | code | match |
| /old-url-1/ | www.url.com/new-url-1/ | 301 | url |
| /old-url-2/ | www.url.com/new-url-2/ | 301 | url |
| /old-url-3/ | www.url.com/new-url-3/ | 302 | url |
| /old-url-4/ | www.url.com/new-url-4/ | 307 | url |
| /old-url-5/ | www.url.com/new-url-5/ | 302 | url |
In the 3rd column (code) enter your preferred type of redirect code depends on the type of redirect you need, such as 301, 302 or 307. (301 = permanent, 302 = temporary, 307 = user agent). Simply enter as ‘url‘ in forth column to specify it as URL match.
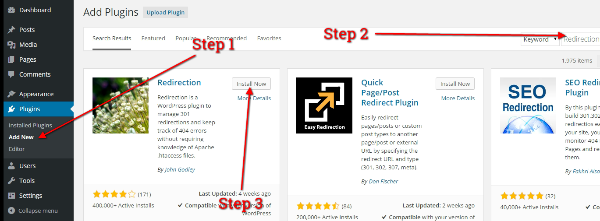
Once you have prepared a CSV file based on above instructions, head over to your WordPress dashboard and go to Tools > Redirection if you already installed and activated the Redirection plugin or install it via Plugins > Add new

Install Redirection Plugin
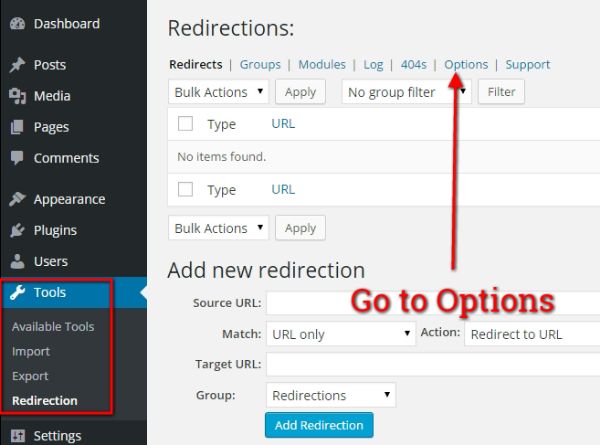
Once you have installed and activated the plugin, go to Tools > Redirection page and dive into options menu to import the bulk URL redirections using CSV file.

Go to Redirection Plugin Options Page

Upload Your CSV File
Now click ‘choose file‘ in redirect plugin options page and select the CSV file what you have prepared earlier and click ‘upload‘ button. In couple of seconds all URL directions are successfully imported and you will get message as shown below.

URL Redirections are Successfully Imported
If you have any difficulties when following above procedure, don’t hesitate to post your comments and question using below comment form. Have a nice day!


Thank you for this article, the official documentation has not mentioned about the CSV format. And built in export function for CSVs doesn’t work. So without your article there iss no way to take advantage of the CSV import functionality unless you look at the source code.